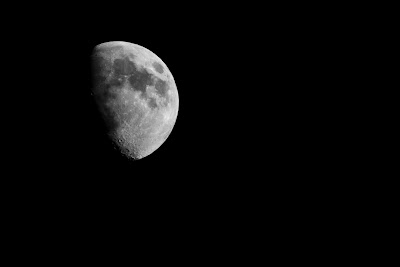
Tricks and tips. I haven't done many of these so I thought, as I was shooting this that maybe it would make a good little piece to post.
Okay, so we have all seen those amazing images of the moon, big bright and details, but how are they shot. If you go out side on a clear night and point your camera up into the sky the chances of getting anything better than a shaky white streak are slim. But, if you take a few things into account you can increase your odds of getting a better image.
1. Time of day. I shot this out my back door at 4:30 PM not the middle of the night.
2. Shutter Speed. If your want those details to be sharp the exposure needs to be fast. Think about it. Your standing on a big ball that is spinning and moving, and you are trying to shoot another moving ball that is spinning too. Right?. Because of this you don't need a tripod if everything else is taking into account.
3. Aperture. Its getting dark so you need as much light to enter your camera as possible and your available light is really really far.
4. Overall exposure. You already know what you need so, now its Ratio Times.
5. ISO the faster/higher you go the more digital noise happens in your file. No one wants that.
So I took all these requirements and set them into my camera. I started with an exposure of 1/60th for my shutter speed (That's as slow as it gets hand held), and my F-Stop at 8.0. just to start. It was a good first step. I got the moon and the sky still had blue in it, but there was no details in my highlights (Face of the Moon). Okay more math. I moved my F-Stop down to 5.6 (that's a full stop open) so I changed my Shutter speed faster to 1/250th to make the same exposure and take the same image. That doesn't mean I changed anything, the RATIO is the same so you'll get the same image. You Following?
To make changes, I was now only left with my Shutter Speed to change, because F-5.6 is as wide as my G11 will open, zoomed in as far as it will go. That's okay Shutter speed is the one thing I want to change. I want it as fast as I can with out loosing highlights. So I pushed it up faster and faster. The exposure's were getting darker and, the shadow detail was getting better. I ended up with an exposure of 1/450th @ F-5.6 at 200ISO.
So I didn't break any Photography rules for a change. I followed basic laws of light and exposure, I just pushed my ratio to make the small amount of light that was in the atmosphere (Blue sky) to go black and let me look at the Man in the Moon properly. There is no Photoshop here either, this is the RAW image.
This is the same rule that make dark blue sky's with the sun still in the frame or the silhouette's of the fire fighter's I posted earlier in the month.
If your out shooting, get OFF of manual and start changing up your exposures, you never know what you might end up with.
Actually, the moon being always lit by the same sun no matter the time of day or night, the proper starting point is actually as disappointingly simple as "Sunny 16" and varies a bit depending on atmospheric conditions.
ReplyDeleteThe tough part is not nailing the moon, but nailing it during the day—you have to be out in time to get the illumination of both the scene and the moon right (plus, of course, its position). Famous examples of this are Adams' "Moon and Half Dome" (in this case, he used a strong orange filter to darken the sky) or "Moonrise Hernandez".